
How to Style Your Entire Squarespace Site Using ONE Simple Step

**This blog uses examples from the 7.0 Mojave template, but the premise can be used for any version or template on Squarespace!**
If you’ve played around with your Squarespace site at all, then you already know about the magic of the Site Styles panel.
It’s where all of the creative formatting wizardry takes place: your fonts, your colors, your button styles, your photo styles, your site background color, your banner image size, your site width…the list goes on (literally, there’s so much to play with!). Basically, Site Styles is how you begin to customize your fabulous website.
If you need some basic help figuring out Site Styles (found under the Design panel > Site Styles), Squarespace has some great support articles that walk you through it — but if you’re already somewhat familiar with this lovely feature, then I’ve got a sweet & simple step that can make all of your styling that much easier.
While Site Styles simplifies what can be a complex process, it can be overwhelming at times (so many choices) and it can be tough to see how all of your style changes & choice look when paired together. It can also be frustrating when you add a new block, know that you need to style it so that it works with the rest of your branding but can’t for the life of you remember what colors you used or which font would look best.
So today I want to share the one, simple step I use every single time I build a website. And it’s literally the first thing I do on every new site. Every single time.
I build a Site Branding Page.
What is a Site Branding Page, you may ask? It’s a page a build where I house all of the fonts, colors, and content blocks that I’m going to use throughout my site — that way, all of my style elements are on ONE page, and if/when I need to tweak something, I can see ALL of my style elements in ONE place.
By the way, you can sign up for a free trial of Squarespace here, and I also snagged you a lil’ deal so use code PARTNER10 for 10% off your first year of Squarespace!
This page helps in a number of ways, but I find it useful because:
It is the perfect way to start a site: by getting all of my style elements in place before I begin, so that way designing the rest of the site is more about layout as opposed to trying to figure out styling AND layout simultaneously.
It keeps all of my style elements in one place, so if I want to redesign or need to know what color(s) I’ve used, I’ve got a place within my site to find the info I need.
It makes every site more cohesive. With all of your style elements and branding materials in one place, your WHOLE site comes together much more easily and in that fabulous” branded” way you were hoping for.
It keeps me & my clients organized. It helps me personally, but it also helps my clients…because then they have a designated place to go post-build where ALL of their design & style info is stored. That way, they’ve got an easy way to store and update their own customization after I turn their site over to them.
It’s one of my favorite website building organizational tricks, and today I’ll walk you through how I set mine up!
Step #1: Build Your Page
Whether you’re just starting a site or you’ve had one for a hot minute, the first thing you’ll do is add a brand new page.
I always add mine to the “Not Linked” section…

…and choose a “blank” page… (I’ll show you how to lay it out, don’t worry!)

…and I always “disable” the page. (This way, no one will accidentally stumble upon it in a Google search, but I can always access it when I need to — win-win!)
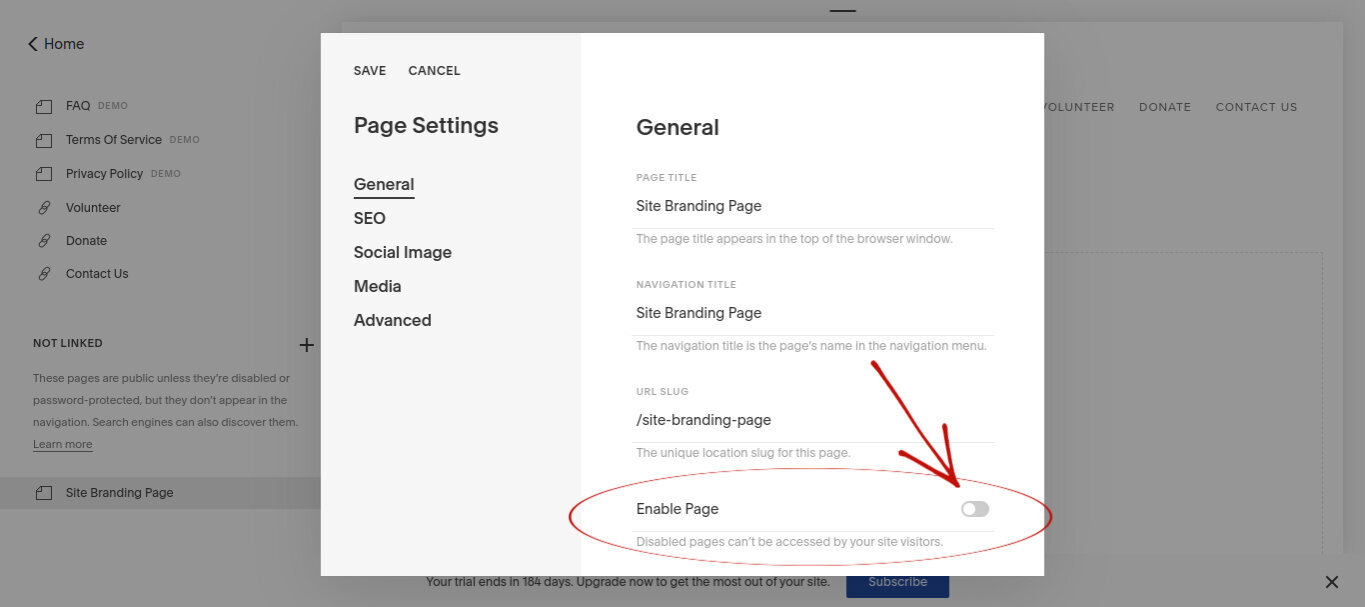
When a page is disabled, it will be toggled off like in this photo! The page title will also appear in a lighter gray in the Pages panel.
I usually title mine “Site Branding Page” (wildly creative, I know), but you’re welcome to call yours whatever you like. “Site Magic Wizardry of the Highest Order” is also a good one, but I’m just spit-balling here.
Step #2: Add Your Basic Branding Info
Okay! You’ve got a brand new, blank page! The world is your oyster! (Too far? Okay. Reeling it back in…)
The first thing I always add to a Site Branding Page is a logo, brand colors and a mood board (my clients usually have the the first two already and I create the mood board to reflect our shared vision for their site based off of the materials they send me!). Occasionally my clients won’t have brand colors chosen or won’t have their colors laid out in an actual palette, so I’ll design a palette image too.
I currently use PicMonkey to create the two above mentioned items (and if you’re not a Photoshop whiz, PicMonkey is a great, easy, affordable place to start playing around! I talk about that a bit more in my blog about the online tools I use to run my business!).
As a result, the logo, colors and mood board are generally saved as JPEGs or PNGs, which means I upload them to the Site Branding Page using Image Blocks.

I upload these first so that I have a good feel for the overall “vibe” of the site — and also so that I have the color codes whenever I want to change colors of fonts/image overlays/buttons/etc. down the line without having the leave the page!

Step #3: Add All of Your Font Styles
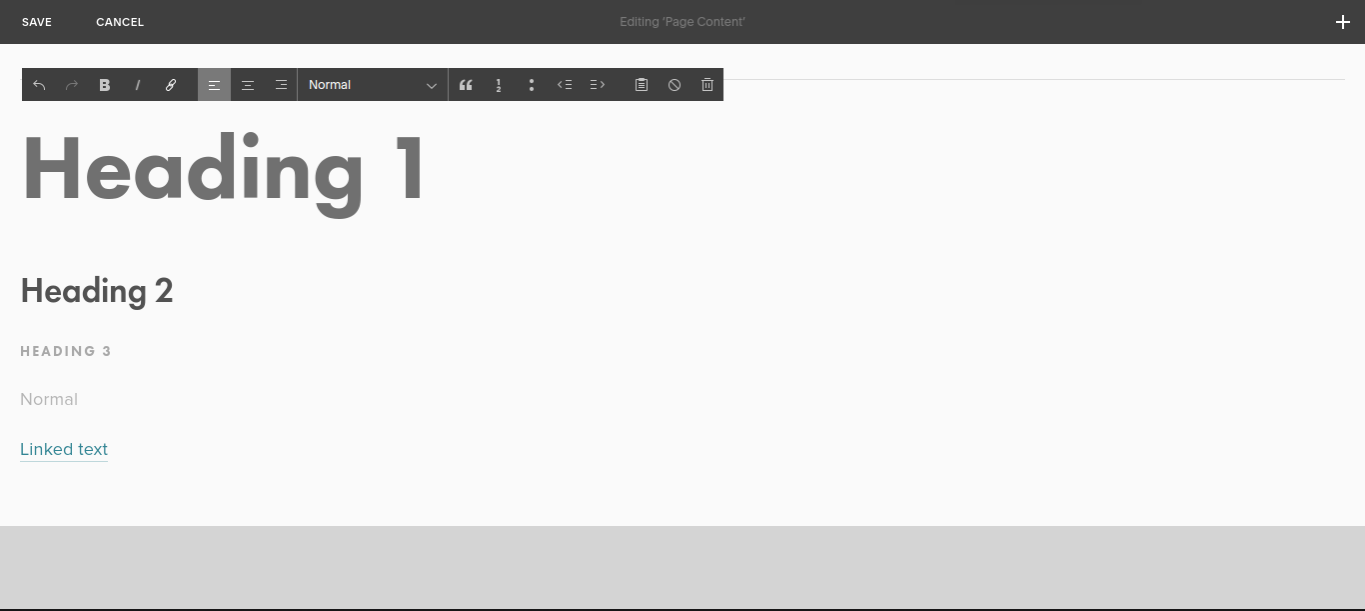
Next up are the header styles — a.k.a your site fonts! I add a Line block underneath the branding materials, just to break up the sections.
As you know, Squarespace only allows four font styles: Heading 1, Heading 2, Heading 3 and Normal text. (Although there is plenty of CSS out there to add Headings 4, 5 and beyond…but today, we’re sticking to basics.)
When I first add them to the page (below the branding materials), they look like this:

Then, of course, I use the text block formatting bar to change them all to reflect their style (i.e. I change “Heading 1” from normal text to “Heading 1,” etc.)

They all reflect their actual heading(s) now!
You may have noticed I also add “Linked Text” as well, since you can change the default color on that to a branded color, too. I just link it to my own site, but you can literally type in any site you want — just use the text block formatting bar to link it!
If you’ve already got specific fonts in mind, awesome! If you need a little help pairing and/or choosing fonts, I like using FontPair to give me ideas. Bonus? All of FontPair’s fonts are Google fonts, which means Squarespace has them on their font list already!
Note: When you first write out your Headers, especially if your site is brand new, the heading & normal fonts will be the template default fonts. The template from my example photos is Mojave.
Advanced: If you DO use CSS to add Headings 4 & 5, make sure to add them underneath the Squarespace fonts using the Markdown block so you can see what they’ll look like next to everything else.
Step #4: Add buttons
Next, I always add buttons using the Button Block. I use buttons e’rrywhere (and you should too — CTAs are verrrrry important!), so styling them in accordance to the site’s branding colors & fonts is pretty key.
I add all three button styles: small, medium and large (and name them accordingly…sometimes it’s tough to tell the difference depending on your template!). You can change the button size within the Button styling block.

Once I’ve got all three buttons on the page, I move them so that they line up next to each other horizontally. You can leave them stacked, this is just a personal preference (the less scrolling on this page, the better!).

Step #5: Other Blocks You May Want To Add
Steps 2 - 4 are my always steps. No matter who’s Site Branding Page I’m building, I always add those elements (branding materials, all font types, all button types) because almost every Squarespace user always uses them!
However, there are other Blocks that could use styling if you feel like you’ll be using them often. A few of the ones I most often add to Site Branding Pages…
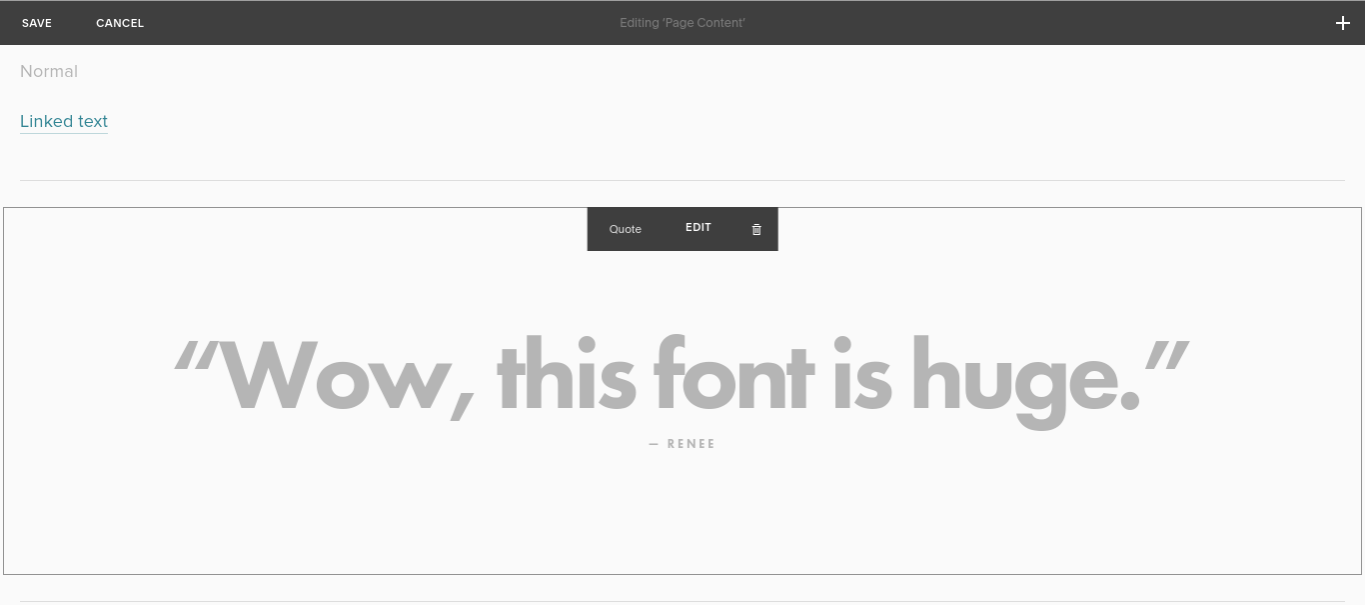
Quote Block
If I format the Quote Block, I usually add it in underneath my Headings/Normal text, so that I can see what all of the text will look like together.

You can leave the “Lorum Ipsum” text & source or write in your own — just make sure you have enough text to get a good feel for how block will look.
Just saying.
Line Block
As I mentioned above, I use lines to break up my sections on this page anyway, so I’ve usually already got a line or two on the page (but if you don’t, simply add a Line Block!). I’m usually okay with the template default color for the lines, but I’ll occasionally want it lighter or darker, so it doesn’t hurt to style it if you want to!

Different Image Styles
If you love the look of the Collage image (hi, I LOVE this block) or the Poster image, add it to this page so you can style these blocks to match your brand.
You’ll be able to change the card color & transparency, font colors & styles, etc. and if you expect to use a certain image block a lot, formatting it from the start makes your life a lot easier (as opposed to laying these images out, restyling them later and finding that the new style completely messes up your layout. That’s pretty much my least favorite thing EVER.)

Step #6: And…Style!
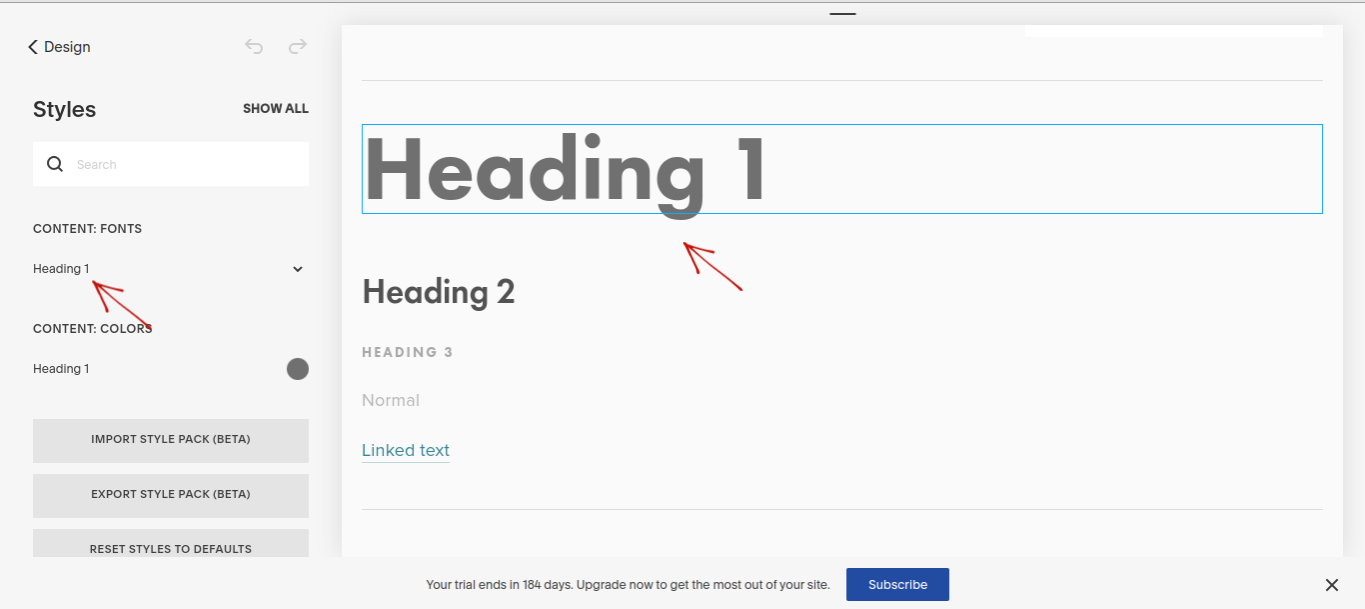
All right…now that you have all of the Blocks on your page that you’ll be using most often throughout your site, you can go to Design > Site Styles, and voila — all of your elements are on one page! (Super helpful especially since you can’t click on other pages when you’re in Site Style mode.)
Simply click on each element one by one to bring up the editor for that particular block in the Site Styles panel (thank you Squarespace for that perk…so much easier than scrolling!) or type the block name into the search panel. Then start playing!

Just a few more tips…
I could literally spend hours on this page and in Site Styles (and trust me, sometimes I do). It can feel frustrating at times, especially when you want your site styled already geez — but if you give yourself some time, some breathing room and some space for good ol’ creativity, this is actually one of the more enjoyable parts of the website building process.
My tips for the styling process:
Name the blocks & elements literally. You might have noticed throughout my examples, but I label every block with it’s own name (i.e. the Collage Image block? I typed out “Collage Image Block.” Heading 1? I titled it…yep…Heading 1). Getting this literal makes it super easy when you want to change a block or style element without having to click on everything to remember which one it was!
Carve out some time for it — even if you’ve got your colors chosen, your fonts locked in and feel like you’re on top of your branding game, there are a lot of different style elements to play around with and it’s easy to get swept up in trying them all out (which I highly recommend anyway!). Make sure you’re not rushed because that’s when it gets stressful.
Speaking of “trying them all out”…try all of the style elements out! Play around with colors, play around with font size, play around button colors and transparency…play around with everything! Squarespace makes the “undo” feature easy to spot (upper right in the Site Styles panel btw), so if you do something and HATE it, you can fix it easily. The more style tweaks you try, the more likely you are to find the look you want.
Allow for error. You may think you’ve got the best colors and fonts around but when they’re applied to your site…not so much. That’s okay! Instead of panicking or being hard on yourself, see it as a chance to get even more creative. I can’t tell you how many times I’ve gone back and redone an entire Site Branding Page because it just didn’t seem “right” when it was done. It’s okay to make mistakes and backtrack — that’s how you get something lovely & authentic in the end.
Take a break if you’re getting too wrapped up in it. If I’m starting to feel like my brain is short circuiting and I’ve been toggling between the same two colors for Heading 2 for the last hour…it’s time for a break. Get up, make some tea, get some fresh air, even switch tasks for a a few hours, and then come back to it. It’s amazing how our brains just need a little reset sometimes.
Final product: A more cohesive website with one simple page.
Now you’ve got a Site Branding Page and your Squarespace styling efforts have become that much more simplified.
Everything is in one place.
You don’t have to bounce in and out of Site Styles because you have to visit different pages to see all of your style elements.
You know exactly where to go when you need to look up a brand color, change a font or even do a complete branding overhaul.
Your site is more organized and you feel more organized…because you are!
I hope this helps in consolidating your styling needs — now go have fun getting creative with your site!
You might also enjoy…
